

Every roll change is a chance to lose the web. A splice that opens early, fails to close at contact or smears adhesive onto the rollers costs you a web break, a re-thread and a pile of waste. Most of those failures trace back to a few minutes of preparation at the unwind stand — which is good news, because preparation is the part you control.
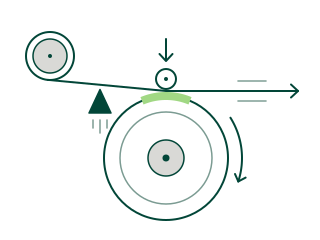
Three ways to splice
How you splice depends on whether the line can stop and how fast it runs.
- Flying splice — the new roll is accelerated to web speed and joined on the run by an automatic splicer. Standard on newspaper presses and high-speed paper and film converting lines, and used on many other web presses.
- Zero-speed splice — an accumulator (festoon) stores web and keeps feeding the line while the expiring roll is briefly stopped and joined. Common on corrugators and heatset web presses, and for film, foil, nonwovens and label stock.
- Manual splice — the line is stopped and the operator joins the webs by hand, as an overlap or a butt splice. Typical on slitter-rewinders, laminators and smaller converting machines.
The steps below follow a flying splice, which asks the most of the tape and the preparation. The same principles — clean surfaces, full contact, no exposed adhesive at the web edges — apply to every method.
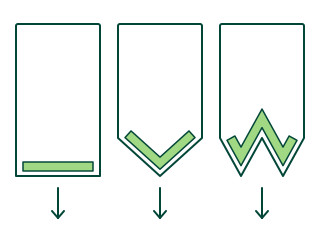
Making a flying splice, step by step
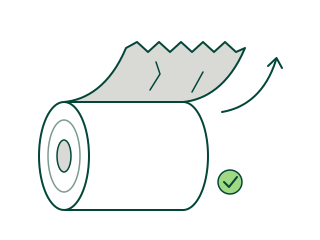
Check and prepare the new roll
First make sure the roll is mounted to unwind the right way round, so the prepared face meets the running web. Then strip off outer wraps until you reach clean, undamaged material — no dents, wrinkles or crushed edges. The surface must be dry and free of dust and fibres: adhesive bonds to whatever sits on the surface, not to the web underneath.
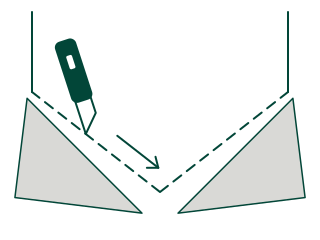
Cut the leading edge to your splice pattern
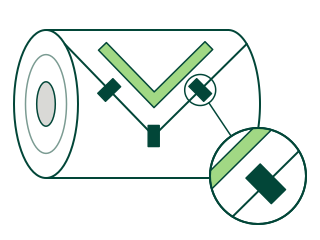
Cut straight, V or W as your splicer is configured, with a sharp blade in one clean stroke drawn away from your other hand. A ragged or frayed edge lifts at speed and starts a tear.
Secure the leading edge with holding tabs
Fix the leading edge to the layer beneath with small holding tabs. They must hold through acceleration and air flow, then let go cleanly when the running web pulls on the splice — too weak and the roll opens early; too strong and the web tears instead of the tab. If you use a splicing tape with a built-in splittable strip, the strip replaces the tabs: check that it is undamaged and follow that tape's own application sequence.
Apply the splicing tape, stopping short of the web edges
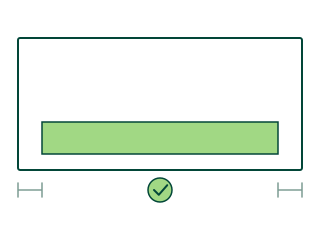
Lay the tape flat along the leading edge, following the cut, without wrinkles and without stretching it. End it 10–20 mm inside each web edge: taken right to the edge, exposed adhesive picks up on idlers and guides or glues the splice to the side of the roll.
Press it down firmly
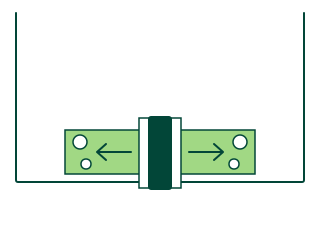
Rub the tape down with a squeegee or hand roller, working from the centre out to both ends of the tape to push out trapped air. A splice holds only where the adhesive is in full contact; bubbles and lifted corners are where it opens. Trim or tape down any loose corners of the web so they cannot flutter.
Remove the liner last, then stand clear
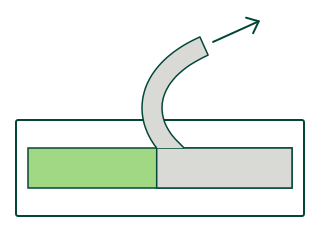
Peel off the release liner as the last step before you arm the splicer, keeping fingers, dust and fibres off the adhesive. If you reinforce the joint, keep the reinforcement off the contact face — the running web can only bond to adhesive it actually touches. Once the roll starts to turn, stay clear of it and of the pasting arm.
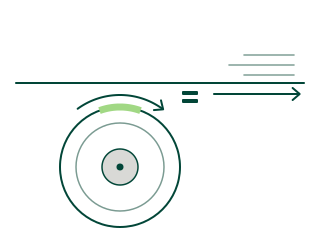
Check the speed match
Make sure the splicer brings the new roll up to the speed of the running web before the two touch. Any difference becomes a tension spike at the moment of the splice — a frequent reason a splice tears or never closes. On splicers that set the speed from a measured roll diameter, check that reading first: a wrong diameter is the usual source of a mismatch.
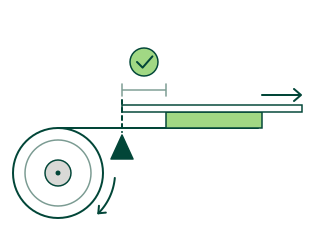
Inspect the tail and log the result
After the splice, look at the tail — the cut end of the running web left behind the joint. It should be the same length from splice to splice and close to the web path between the contact point and the knife. Much shorter means the knife fired before the bond took; much longer leaves a flap that can fold back and wrap a roller; a missed cut drags the old web into the line. Log every failed splice with the roll, the tape and the line speed — patterns show up quickly.
When the line stops: manual splices
On machines without an automatic splicer, the operator joins the old and new webs by hand — with the line stopped and the drives locked out, so no roller can turn while hands are at the web. There are two basic joints.
- Overlap (lap) splice — the new web overlaps the old by a short length, with double-sided splicing tape between them and, where an edge could catch, a strip of single-sided tape over it. Quick and strong, but it leaves a double-thickness step that has to pass every nip and roller.
- Butt splice — both ends are cut square and butted edge to edge, then joined with single-sided splicing tape across the seam, often on both faces. The webs do not overlap, so the joint adds only the thickness of the tape — which is why it is preferred for films, labels and print work where the splice must pass tight gaps or be printed over.
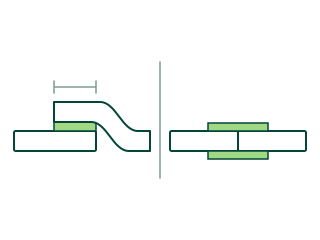
For either joint, cut both ends square and clean, line the webs up before taping, press the tape down along its full length and trim off any tape that overhangs the web edges.
Choosing the right splicing tape
The best preparation will not save a tape that is wrong for the job. Specify it on these points:
- Material — paper, board, film, foil or nonwovens. Surface energy, porosity and coatings all change how quickly an adhesive grabs.
- Carrier — tissue and nonwoven carriers are thin and conformable; PET film carriers add strength, heat resistance and dimensional stability for films and high web tension.
- Adhesive — it needs instant tack to bond in a fraction of a second at speed, and shear strength to hold under web tension. In paper mills, a fully repulpable tape (carrier and adhesive) lets splice waste go back into the pulper.
- Temperature — splices that travel through dryers, calenders or laminating rollers need an adhesive that will not soften or ooze in the heat.
- Thickness — thinner splices pass nips, calenders and print units without marking or breaking.
- Width — higher speeds load the joint harder in a shorter moment, so a wider tape gives the bond more area to carry that load.
- Detection — black tapes, or tapes with aluminium foil strips, let optical sensors or metal detectors find the splice so the section containing it can be rejected automatically, as hygiene product lines typically require.
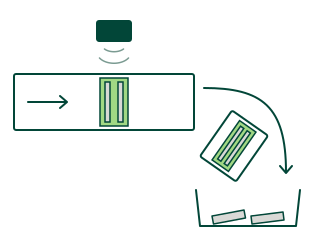
Troubleshooting splice failures
- What you see
- The roll opens before the splice
- Likely cause
- Holding tabs too weak or too few; hard acceleration or strong air flow
- What to change
- Add or strengthen tabs near the leading edge; check the acceleration ramp
- What you see
- The splice does not close at contact
- Likely cause
- Speeds not matched; liner not fully removed; tape not pressed down; dust or moisture on the roll; contact pressure too low
- What to change
- Match the new roll's surface speed to web speed; check the liner is fully off; press down with a squeegee; clean the roll surface; check contact roller pressure
- What you see
- The web breaks just after the splice
- Likely cause
- Holding tabs too strong to release; tail too long or loose; fluttering corners; wrinkles in the tape; a tension spike
- What to change
- Use weaker or fewer tabs; adjust the knife timing; trim loose corners; lay the tape flat; check tension control
- What you see
- Adhesive builds up on the rollers
- Likely cause
- Tape taken to the web edge or overhanging it; adhesive softening in heat
- What to change
- Keep the tape in from both web edges; use a heat-resistant adhesive
- What you see
- The splice comes apart in a hot section
- Likely cause
- The adhesive loses strength at temperature
- What to change
- Move to a heat-resistant adhesive and, for very hot sections, a film carrier
- What you see
- The splice marks or breaks at a nip
- Likely cause
- The splice is too thick or too stiff
- What to change
- Use a thinner tape, or a butt splice instead of an overlap
- What you see
- The sensor misses the splice
- Likely cause
- The tape is not detectable, or the detection strip runs outside the sensor's path
- What to change
- Use a detectable tape and line its strip up with the sensor
Checklist before every splice
- Roll mounted the right way round for the unwind
- Outer wraps removed down to clean, undamaged material
- Leading edge cut cleanly to the right pattern
- Holding tabs in place, at the right strength
- Tape flat, wrinkle-free, following the cut and set in from both web edges
- Tape pressed down with no trapped air; loose corners trimmed
- Liner removed last; nothing covering the contact face
- Speed match, contact pressure and knife timing checked
- Detection strip lined up with the sensor, where one is used
Finding the right splicing solution
Whatever the line — paper, board, film, foil or nonwovens; flying, zero-speed or manual splicing; heat or detection in the process — we have a splicing solution for it. Tell us your machine, the material and the line speed, plus any heat or detection requirements, and our technical team will recommend the right one.